February Daring Bakers Challenge: Flourless Chocolate Cake
February 28, 2009

The February 2009 challenge is hosted by Wendy of WMPE’s blog and Dharm of Dad ~ Baker & Chef. We have chosen a Chocolate Valentino cake by Chef Wan; a Vanilla Ice Cream recipe from Dharm and a Vanilla Ice Cream recipe from Wendy as the challenge. I thought last month’s challenge was simple, but this month wins for the most minimalist of all recipes attempted for Daring Bakers Challenge thus far. When there are only three ingredients, the quality of the three is paramount. I used E. Guittard dark chocolate and as I was forwarned, the cake tasted exactly like the chocolate used.
This month I had a slight cake disaster, and as I completed the challenge the day before the posting date, I had neither the time nor the inclination to make another cake. Here’s what I learned:
- Use an 8″ (or larger) pan. I thought that the recipe called for an 8″ heart pan, which seemed to me to translate to a 7″ pan. I even scoured my local kitchenware store for the non-standard sized 7″ spring form cake pan. It made the cooking time longer to have such a deep cake, not to mention the cake’s precariously rising above the edge of the pan.

- Do not unmold the pan after 10 minutes, as the recipe calls for. My cake oozed out immediately after being freed from its form. And like toothpaste, you can’t put it back in the tube. It would have been fine it I had simply let it cool completely in the pan.

Oh dear.
Chocolate Valentino
Preparation Time: 20 minutes
16 ounces (1 pound) (454 grams) of semisweet chocolate, roughly chopped
½ cup (1 stick) plus 2 tablespoons (146 grams total) of unsalted butter
5 large eggs separated
1. Put chocolate and butter in a heatproof bowl and set over a pan of simmering water (the bottom of the bowl should not touch the water) and melt, stirring often.

2. While your chocolate butter mixture is cooling. Butter your pan and line with a parchment circle then butter the parchment.
3. Separate the egg yolks from the egg whites and put into two medium/large bowls.
4. Whip the egg whites in a medium/large grease free bowl until stiff peaks are formed (do not over-whip or the cake will be dry).
5. With the same beater beat the egg yolks together.
6. Add the egg yolks to the cooled chocolate.
7. Fold in 1/3 of the egg whites into the chocolate mixture and follow with remaining 2/3rds. Fold until no white remains without deflating the batter. {link of folding demonstration}
8. Pour batter into prepared pan, the batter should fill the pan 3/4 of the way full, and bake at 375F/190C
9. Bake for 25 minutes until an instant read thermometer reads 140F/60C.
Note – If you do not have an instant read thermometer, the top of the cake will look similar to a brownie and a cake tester will appear wet.
10. Cool cake on a rack for 10 minutes then unmold.

My son, the chocoholic, thought the cake smelled heavenly.
Dharm’s Ice Cream Recipe
Classic Vanilla Ice Cream
Preparation Time: 30 minutesRecipe comes from the Ice Cream Book by Joanna Farrow and Sara Lewis (tested modifications and notes in parentheses by Dharm)
Ingredients
1 Vanilla Pod (or substitute with vanilla extract)
300ml / ½ pint / 1 ¼ cups Semi Skimmed Milk – in the U.S. this is 2% fat (or use fresh full fat milk that is pasteurised and homogenised {as opposed to canned or powdered}). Dharm used whole milk.
4 large egg yolks
75g / 3oz / 6 tbsp caster sugar {superfine sugar can be achieved in a food processor or use regular granulated sugar}
5ml / 1 tsp corn flour {cornstarch}
300ml / ½ pint / 1 ¼ cups Double Cream (48% butter fat) {in the U.S. heavy cream is 37% fat)
{you can easily increase your cream’s fat content by heating 1/4 cup of heavy cream with 3 Tbs of butter until melted – cool to room temperature and add to the heavy cream as soon as whisk marks appear in the cream, in a slow steady stream, with the mixer on low speed. Raise speed and continue whipping the cream) or use heavy cream the difference will be in the creaminess of the ice cream.
1. Using a small knife slit the vanilla pod lengthways. Pour the milk into a heavy based saucepan, add the vanilla pod and bring to the boil. Remove from heat and leave for 15 minutes to allow the flavours to infuse
Lift the vanilla pod up. Holding it over the pan, scrape the black seeds out of the pod with a small knife so that they fall back into the milk. SET the vanilla pod aside and bring the milk back to the boil.
2. Whisk the egg yolks, sugar and corn-flour in a bowl until the mixture is thick and foamy. 3. Gradually pour in the hot milk, whisking constantly. Return the mixture to the pan and cook over a gentle hear, stirring all the time
4. When the custard thickens and is smooth, pour it back into the bowl. Cool it then chill.
5. By Hand: Whip the cream until it has thickened but still falls from a spoon. Fold it into the custard and pour into a plastic tub or similar freeze-proof container. Freeze for 6 hours or until firm enough to scoop, beating it twice (during the freezing process – to get smoother ice cream or else the ice cream will be icy and coarse)
By Using and Ice Cream Maker: Stir the cream into the custard and churn the mixture until thick (follow instructions on your ice cream maker)

We were required to make an ice cream to accompany the dense cake, and I opted for a classic vanilla bean recipe, using organic cream and milk. The verdict? Decadently rich, a sliver of this cake goes a long way, even for self-admitted chocoholics. Thanks to this month’s hosts for a wonderful challenge!
Korean style chicken wings – crispy wings with sweet ginger glaze
February 15, 2009

Sticky and sweet – finger lickin’ good
I recently made a batch of these chicken wings for a Super Bowl party after hearing there was a Buffalo wing shortage in the area. Of course, these are not Buffalo wings, but I snatched up several packages of chicken wings just in case. Korean style chicken wings can be spicy, although they usually are sweet and sour (and almost always delicious). This recipe is always a big hit at any party or potluck for adults and children alike. Just be sure to keep plenty of napkins on hand.
Korean-style Crispy Chicken Wings with Sweet Ginger Glaze
30 pieces of chicken wings, rinsed and patted dry
1 medium onion, finely minced
3 cloves garlic, finely minced
1″ piece of ginger, finely minced
1 egg, lightly beaten
1 1/2 tsp. salt
1/2 tsp. pepper
1/2 C. flour
1/2 C. corn starch
Glaze
2″ peeled ginger, thinly sliced
3/4 C. water
3/4 C. packed dark brown sugar
1/2 C. vinegar
2 Tbs. soy sauce
1/2 C. corn syrup
1 tsp. red pepper flakes (optional)
oil for frying

Heat oil on medium high in large skillet or pan. Combine minced onion, garlic, ginger, egg, salt and pepper in a large bowl. Add chicken wings and coat thoroughly. Then add flour and corn starch to chicken mixture and coat well.

Cooking in batches, fry chicken wings in oil over medium to medium high heat for about 15 minutes until golden brown.

In the meantime, bring water, brown sugar, soy sauce and ginger slices to a rolling boil in small sauce pan. Boil vigorously for 15 minutes. Lower heat to medium and add corn syrup. Cook until mixture thickens to the point where the glaze stops half way when dripped from a spoon.


Take out ginger slices with a slotted spoon and set aside when slightly thinner than you want. It will thicken significantly as it sits.
The key to crispy chicken is cooking it twice, so after you cook all the chicken wings once, refry briefly (about 3 minutes or so) right before you are ready to serve.
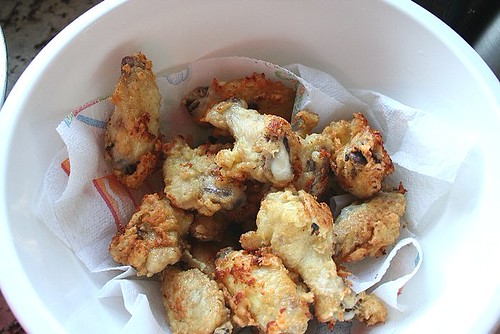
Pale and limp looking once-cooked chicken

Deep golden brown and super crispy twice-cooked chicken
Drizzle glaze over the chicken and toss carefully. Serve immediately and be prepared for to be asked for the recipe.
Throwing a tea party – American Girl style
February 4, 2009

My daughter recently turned eight, the minimum age recommended for American Girl dolls. It’s amazing, really, since before this age, my daughter wouldn’t give these dolls the time of day, and since these dolls are about $90 a pop, I wasn’t about to push it. Just as she approached her birthday, however, her interest increased exponentially with every over-sized catalog that appeared with alarming regularity in our mailbox. Somehow she ended up with three new dolls between Christmas and her birthday, much to her delight, and I’ll be totally honest, mine as well. Helping her brush and curl her dolls’ hair and changing those dolls into adorable tiny outfits are more than a little nostalgic and speaks to the eight year old doll lover in me.
So when it came to making a decision about how to celebrate her birthday, we initially thought to bring a couple of her friends with us into the New York City American Girl Place and have lunch and perhaps take in one of the shows they have there. After it proved too difficult for my daughter to narrow it down to just two friends, I decided to bring the American Girl Café to our house.
The English certainly have elevated this afternoon ritual to a fine art, and I have been refining my teas parties over the course of the past decade, first for bridal showers, then baby showers, and now, little girl tea parties. I found the menu for afternoon tea at the American Girl Café on their website, and followed it fairly closely. This is what we decided on for the menu, with only minor changes:
Warm Welcome
Savory Treats
Kristen’s Wild Blueberry-Lemon Scones
served with fruit preserves and Devonshire cream
Kit’s Garden-Party Sandwiches
with vegetable cream cheese and cucumber
Kaya’s Egg-Salad Tea Sandwiches
Felicity’s Patriotic Roasted Turkey Sandwiches
with cranberry mayonnaise
Sweet Surprises
Birthday Cupcake
Addy’s Linzer “Love” Cookie
Molly’s Victory-Garden Chocolate Ice Cream Flowerpot

The table settings with menu. The pink lemonade was from a mix, as I often find refrigerated pink lemonade is somewhat orangey.

Every seat had a place setting for a doll, complete with a mini menu.

These sticky cinnamon buns were a huge hit with the girls. This is one thing on the menu you do not want to skip.

Blueberry lemon scones – delicious plain, but heavenly with a dot of clotted cream. If you cannot find it or want to save $7.50, just serve with butter.

Banana macadamian nut mini muffins – moist and delicious! The Irish Soda bread is lighter than my usual recipe and perfect with a little butter and a cup of tea.

These three kinds of tea sandwiches are pretty basic. I used Pepperidge Farm thin slice bread, both white and wheat.
-
Kit’s Garden-Party Sandwiches with vegetable cream cheese and cucumber: I used Philadelphia Brand vegetable cream cheese, seedless cucumber thinly sliced on a mandolin, and a grape tomato on top.
-
Kaya’s Egg-Salad Tea Sandwiches: I make my egg salad with curry powder and dry mustard. I also put alfalfa sprouts on top the egg salad for added freshness.
-
Felicity’s Patriotic Roasted Turkey Sandwiches with cranberry mayonnaise: I boiled 1/2 C. of frozen whole cranberries in 1/2 C. of water and 4 Tbs. of sugar until the cranberries cracked and thickened. After chopping, I threw these into a cup of mayonnaise and served with smoked turkey breast. I cut small butterflies from cheddar cheese and placed these on top of each turkey sandwich. Another variation would be to cut out stars and use flag toothpicks to skewer them together.

Iced sugar cookies in heart and star shapes. One activity during the party was cookie decorating with plain sugar cookies and a variety of colored royal icing in small ziplock baggies with an end snipped off and various sprinkles. Just be prepared to be sweeping up sprinkles for the next week.

Basic vanilla cupcakes with buttercream icing.

Molly’s Victory-Garden Chocolate Ice Cream Flowerpot – This is a modification from the version served at the American Girl cafe. I took the idea from the Pioneer Woman Cooks blog, substituting ice cream from chocolate mousse and a real flower instead of artificial. One word of caution – do not place ice cream straight into the clay pot as it is not meant for food service. I found small aluminum muffin tins that fit the pot like a glove. This is a great make ahead part of the tea, and you simply take out the ice cream tins just before serving and place flower in the straw. Let ice cream thaw a bit, otherwise you will have impenetrable ice cream and ground oreo dirt everywhere.
So now you too can throw an American Girl tea party that even the adults will love. Be sure to have a pot of real tea on hand.
Bakers Challenge for January: Tuiles
January 30, 2009

This month’s challenge is brought to us by Karen of Bake My Day and Zorra of 1x umruehren bitte aka Kochtopf. They have chosen Tuiles from The Chocolate Book by Angélique Schmeink and Nougatine and Chocolate Tuiles from Michel Roux. My daughter turned 8 this month, and I decided to make tuiles tiaras, perfect for my little drama queen. I paired it with raspberry sorbet and the crisp cookie was a great hit among the 8 year old set. By far the simplest and most inexpensive Daring Bakers Challenge I’ve participated in, it was was also enjoyed by everyone who tasted it.
Following is a recipe taken from a book called “The Chocolate Book”, written by female Dutch Master chef Angélique Schmeinck.1/2 cup / 2.3 ounces sifted all purpose flour
1 table spoon cocoa powder/or food coloring of choice
Butter/spray to grease baking sheet
Tuiles
Yields: 20 small butterflies/6 large (butterflies are just an example)
Preparation time batter 10 minutes, waiting time 30 minutes, baking time: 5-10 minutes per batch
65 grams / ¼ cup / 2.3 ounces softened butter (not melted but soft)
60 grams / ½ cup / 2.1 ounces sifted confectioner’s sugar
1 sachet vanilla sugar (7 grams or substitute with a dash of vanilla extract)
2 large egg whites (slightly whisked with a fork)
65 grams /
Oven: 180C / 350F
Using a hand whisk or a stand mixer fitted with the paddle (low speed) and cream butter, sugar and vanilla to a paste. Keep stirring while you gradually add the egg whites. Continue to add the flour in small batches and stir to achieve a homogeneous and smooth batter/paste. Be careful to not overmix.

Cover the bowl with plastic wrap and chill in the fridge for at least 30 minutes to firm up. (This batter will keep in the fridge for up to a week, take it out 30 minutes before you plan to use it).
Line a baking sheet with parchment paper or grease with either butter/spray and chill in the fridge for at least 15 minutes. This will help spread the batter more easily if using a stencil/cardboard template such as the butterfly. Press the stencil on the bakingsheet and use an off sided spatula to spread batter. Leave some room in between your shapes. Mix a small part of the batter with the cocoa and a few drops of warm water until evenly colored. Use this colored batter in a paper piping bag and proceed to pipe decorations on the wings and body of the butterfly (or tiara).
 Bake butterflies in a preheated oven (180C/350F) for about 5-10 minutes or until the edges turn golden brown. Immediately release from bakingsheet and proceed to shape/bend the cookies in the desired shape. These cookies have to be shaped when still warm, you might want to bake a small amount at a time or maybe put them in the oven to warm them up again. (Haven’t tried that). Or: place a bakingsheet toward the front of the warm oven, leaving the door half open. The warmth will keep the cookies malleable.
If you don’t want to do stencil shapes, you might want to transfer the batter into a piping bag fitted with a small plain tip. Pipe the desired shapes and bake. Shape immediately after baking using for instance a rolling pin, a broom handle, cups, cones….

Time to pay the piper: Creamy Orzo with Chicken and Mushrooms
January 7, 2009

After eight months of daring baking, Thanksgiving, a Christmas party, gallons of cream, pounds of chocolate, and bricks of butter, I had to take a cold look at my jeans I was having trouble buttoning. No, the jeans weren’t shrinking in the wash – it was the almost 8 pounds I have gained in the past year. So, I, along with millions of others, decided to shed those extra pounds this new year.
I dusted off my old Weight Watchers cookbooks and decided to try this recipe from In One Pot, a surprisingly good cookbook for those trying to lose weight while still wanting to cook with real ingredients (translation: nary a condensed cream of anything soup to be seen). I decided to try this orzo recipe since it is similar to a mushroom risotto I blogged about a month or so ago. Orzo is an easy alternative to the constant stirring risotto requires.
CREAMY ORZO WITH CHICKEN AND MUSHROOMS
Adapted from Weight Watchers In One Pot
Yield 6
1 C. serving = 5 points
1 1/2 Tbs. extra virgin olive oil
1 chopped onion
1 minced garlic clove
3/4 lb fresh shiitake, crimini or baby bella mushrooms, stems discarded, caps sliced
1/3 C. dry sherry
2 C. low-fat milk (1%)
4 tsp. cornstarch
1/2 tsp. salt
freshly ground pepper to taste
1/8 tsp. ground nutmeg
3 C. cooked orzo
10 oz. cooked chicken breast
1/4 C. chopped fresh parsley
Heat oil in large non-stick skillet or dutch oven over medium high heat. Add onions and garlic and cook, stirring until softened, about 3 minutes. Add the mushrooms and cook, stirring occasionally until lightly brown, about 4-5 minutes. Add sherry and cook until it evaporates, about 1 minute.

Combine milk, cornstarch , salt, pepper and nutmeg in a bowl until smooth. Add the milk mixture into the skillet and cook over medium-low heat, stirring constantly, until the mixture bubbles and thickens, about 3 minutes.


Stir in the orzo and chicken. Cook, stirring occasionally until heated through for several minutes. Remove from heat and stir in the parsley.

Daring Bakers Challenge for December: French Yule Log
December 30, 2008

This month’s challenge is brought to us by the adventurous Hilda from Saffron and Blueberryand Marion from Il en Faut Peu Pour Etre Heureux. They have chosen a French Yule Log by Flore from Florilege Gourmand. I was this close to skipping this month’s challenge as I was up to my eyeballs in cocktail parties, cookie baking, gift shopping and holiday meal preparations. I certainly was not up for step-by-step photographs of an 18 page long recipe, even if I did decide to brave this month’s challenge. In spite of the daunting nature of the tome they were passing off as a recipe, I decided that this buche de noël was going to be the perfect dessert for Christmas Eve.
The recipe is available here for those brave enough to tackle this time-consuming but exquisite dessert. Just be prepared to go through ungodly amounts of cream, eggs and butter. Also realize you will dirty every single bowl, whisk, pan, food processor, stand mixer, and hand mixer that you own. And maybe some of your neighbor’s as well.
A few things I learned while making this dessert:
- Planning goes a long way. Always read the recipe completely (all 18 pages) before starting.
- Let the yule log thaw completely before attempting to cut and eat it. (or photograph it for that matter).
- caramel + chocolate (mixed together) = heaven on earth
I made all 6 elements of the recipe (mousse, creme brulee insert, praline (crisp) insert, ganache insert, dacquoise biscuit, and icing) exactly as suggested, with no variation as I was still Christmas shopping on Christmas Eve. I also had no time to make pretty decorations (hence the sprig of holly plopped on top) and I especially had no time to wait for the yule log to come to room temperature. I like to think the frost on the chocolate icing is in keeping with the wintry “Jack Frost” feel.

My husband, who has tasted all of my culinary endeavors, proclaimed this was the most delicious thing I have ever made. Too bad my photos couldn’t do it justice.
The secret to perfect chocolate chip cookies
December 18, 2008

Yesterday on a long drive from Baltimore, I listened to scientist and baker Shirley Corriher explain the chemistry of baking on NRP. Several things she said piqued my interest, but I raised the volume when she explained how chocolate chip cookies sometimes flatten and spread, making that unwanted crepe-like cookie. She said to do two things to keep those cookies thick like one sees in bakeries.
- Use bread or unbleached flour since they have a higher protein content.
- Make the dough and refrigerate overnight to let it hydrate for a longer period. The longer the moisture can combine, the better for more gluten strands and breaking down starches and sugars.
I decided to make a test batch using both techniques (I used unbleached bread flour to hedge my bets). I used the classic Toll House recipe (I usually do) with Ghiardelli semisweet chip and walnuts. The results? Absolutely no spread whatsoever. I’m not sure if it was the bread flour or the refrigeration, but these cookies were the perfect thickness. Try one or both of these easy steps to ensure perfect chocolate chip cookies the next time you bake a batch.

Fixing a Cake Disaster: Sugared Fruit to the Rescue
December 12, 2008

It’s one of those philosophical questions that all bakers and cooks must face at some point: when is a cake worth saving? You’ve baked an amazing dessert for a function, the house smells amazing, you turn over the bunt pan and … half the cake remains stuck in the pan. The good news is the kids can now have a piece of that delicious chocolate cake they’ve been smelling for the past couple of hours. The bad news is your cake is ruined.

Or is it? Well, there’s the obvious solution of a glaze on top. Tried it. Still looks like the second hole on the golf course with all the missing divots.

I needed something to cover the glaze and the flattened top. Sugared fruit is a wonderful and seasonally appropriate way to decorate a cake and cover a multitude of flaws. All you need is fruit (hard skinned fruit works best), egg whites (I use meringue powder) and super-fine sugar (pulse regular sugar in a food processor if you don’t want to make an extra trip to the market).
Simply brush the fruit with the egg whites, cover with sugar, and let dry. Simple as that!


Doesn’t it look like I always meant to put those gorgeous sugared fruit atop my chocolate cake? It’ll be our secret.

(I use this recipe for my go-to chocolate cake. Try it – I know you’ll thank me.)

I am in the midst of preparing for our annual Christmas party, so forgive me if the entries are sparse this week. We have been throwing this adults-only cocktail party for about 8 years, taking the occasional year off because of burn out. Last year was our most recent bye year, but our party is back, better than ever (hopefully). As with any annual meal/party, I always keep a few favorites and introduce a few new recipes. I recently stumbled on this savory biscotti recipe on Epicurious, and wow – it’s a keeper. It is perfect with a glass of red wine (or white for that matter) as it is a dry cookie, as biscotti should be. The bite of the cracked black pepper elevates what would have been simply a good cheese cracker to fabulous savory biscuit.
PARMESAN BLACK-PEPPER BISCOTTI
1 1/2 tablespoons whole black peppercorns
4 cups all-purpose flour plus additional for dusting
2 teaspoons baking powder
2 teaspoons salt
4 1/2 ounces Parmigiano-Reggiano, finely grated (2 1/4 cups)
1 1/2 sticks (3/4 cup) cold unsalted butter, cut into 1/2-inch cubes
4 large eggs
1 cup whole milk
Put oven racks in upper and lower thirds of oven and preheat oven to 350°F.
Pulse peppercorns in grinder until coarsely ground.

Whisk together flour, baking powder, salt, 2 cups cheese, and 1 tablespoon ground black pepper in a large bowl. Blend in butter with a pastry blender or your fingertips until mixture resembles coarse meal. Whisk 3 eggs with milk and add to flour mixture, stirring with a fork until a soft dough forms.

Turn dough out onto a lightly floured surface and quarter dough. Using well-floured hands, form each piece into a slightly flattened 12-inch-long log (about 2 inches wide and 3/4 inch high). Transfer logs to 2 ungreased large baking sheets, arranging logs about 3 inches apart.

Whisk remaining egg and brush some over logs, then sprinkle tops of logs evenly with remaining 1/4 cup cheese and 1/2 tablespoon ground pepper. Bake, rotating sheets 180 degrees and switching position of sheets halfway through baking, until logs are pale golden and firm, about 30 minutes total. Cool logs to warm on sheets on a rack, about 10 minutes.
Reduce oven temperature to 300°F.
Carefully transfer 1 warm log to a cutting board and cut diagonally into 1/2-inch-thick slices with a serrated knife. Arrange slices, cut sides down, in 1 layer on a baking sheet. Repeat with remaining logs, transferring slices to sheets. Bake, turning over once, until golden and crisp, 35 to 45 minutes total. Cool biscotti on baking sheets on racks, about 15 minutes.

Hitting the Spot: Pot Roast
December 3, 2008

Who doesn’t love a pot roast on a cold, dark December night? I’ve tinkered with my pot roast recipe over the years, but I’ve pretty much settled on this variation since everyone in the family loves it as is. A few pot roast tips: always buy chuck roast (sometimes labeled “pot roast”), use leftover marinara sauce, skip the crock pot and use a heavy dutch oven.
Pot Roast
serves 6
2.5-3 lb. chuck roast
3 Tbs. olive oil
3-4 cloves of garlic, sliced
2 Tbs. flour
1/2 C. dry red wine
1 C. beef stock
1/2 C. crushed tomatoes (or marinara sauce)
3-4 whole allspice berries
2 bay leaves
salt and pepper to taste
4 potatoes, peeled and cut into 1 inch chunks
2 large carrots, peeled and sliced
1 large onion, peeled and quartered
16 oz. broad egg noodles
2 Tbs. chopped parsley for garnish
Preheat oven to 350º. Heat olive oil in large Dutch oven on medium high heat. Dredge chuck roast in flour and sprinkle with salt and pepper. Sautee garlic until golden – take garlic out of the pot and put aside. Brown pot roast on both sides – about 4 minutes per side.

Take out chuck roast and set aside. Pour red wine in and scrape up brown bits with a wooden spoon. Cook for a few minutes until liquid is reduced by half.

Add beef stock, crushed tomatoes, cooked garlic, chuck roast, allspice berries and bay leaves to pot. Cover and place in oven for one hour.

Remove pot from oven. Turn chuck roast over and place potatoes, carrots and onions in pot. Recover and place in oven for 45 minutes more. Ten minutes before pot roast is to be removed, cook noodles according to directions. Remove pot from the oven and slice meat against the grain. Serve over noodles with parsley.


