Throwing a tea party – American Girl style
February 4, 2009

My daughter recently turned eight, the minimum age recommended for American Girl dolls. It’s amazing, really, since before this age, my daughter wouldn’t give these dolls the time of day, and since these dolls are about $90 a pop, I wasn’t about to push it. Just as she approached her birthday, however, her interest increased exponentially with every over-sized catalog that appeared with alarming regularity in our mailbox. Somehow she ended up with three new dolls between Christmas and her birthday, much to her delight, and I’ll be totally honest, mine as well. Helping her brush and curl her dolls’ hair and changing those dolls into adorable tiny outfits are more than a little nostalgic and speaks to the eight year old doll lover in me.
So when it came to making a decision about how to celebrate her birthday, we initially thought to bring a couple of her friends with us into the New York City American Girl Place and have lunch and perhaps take in one of the shows they have there. After it proved too difficult for my daughter to narrow it down to just two friends, I decided to bring the American Girl Café to our house.
The English certainly have elevated this afternoon ritual to a fine art, and I have been refining my teas parties over the course of the past decade, first for bridal showers, then baby showers, and now, little girl tea parties. I found the menu for afternoon tea at the American Girl Café on their website, and followed it fairly closely. This is what we decided on for the menu, with only minor changes:
Warm Welcome
Savory Treats
Kristen’s Wild Blueberry-Lemon Scones
served with fruit preserves and Devonshire cream
Kit’s Garden-Party Sandwiches
with vegetable cream cheese and cucumber
Kaya’s Egg-Salad Tea Sandwiches
Felicity’s Patriotic Roasted Turkey Sandwiches
with cranberry mayonnaise
Sweet Surprises
Birthday Cupcake
Addy’s Linzer “Love” Cookie
Molly’s Victory-Garden Chocolate Ice Cream Flowerpot

The table settings with menu. The pink lemonade was from a mix, as I often find refrigerated pink lemonade is somewhat orangey.

Every seat had a place setting for a doll, complete with a mini menu.

These sticky cinnamon buns were a huge hit with the girls. This is one thing on the menu you do not want to skip.

Blueberry lemon scones – delicious plain, but heavenly with a dot of clotted cream. If you cannot find it or want to save $7.50, just serve with butter.

Banana macadamian nut mini muffins – moist and delicious! The Irish Soda bread is lighter than my usual recipe and perfect with a little butter and a cup of tea.

These three kinds of tea sandwiches are pretty basic. I used Pepperidge Farm thin slice bread, both white and wheat.
-
Kit’s Garden-Party Sandwiches with vegetable cream cheese and cucumber: I used Philadelphia Brand vegetable cream cheese, seedless cucumber thinly sliced on a mandolin, and a grape tomato on top.
-
Kaya’s Egg-Salad Tea Sandwiches: I make my egg salad with curry powder and dry mustard. I also put alfalfa sprouts on top the egg salad for added freshness.
-
Felicity’s Patriotic Roasted Turkey Sandwiches with cranberry mayonnaise: I boiled 1/2 C. of frozen whole cranberries in 1/2 C. of water and 4 Tbs. of sugar until the cranberries cracked and thickened. After chopping, I threw these into a cup of mayonnaise and served with smoked turkey breast. I cut small butterflies from cheddar cheese and placed these on top of each turkey sandwich. Another variation would be to cut out stars and use flag toothpicks to skewer them together.

Iced sugar cookies in heart and star shapes. One activity during the party was cookie decorating with plain sugar cookies and a variety of colored royal icing in small ziplock baggies with an end snipped off and various sprinkles. Just be prepared to be sweeping up sprinkles for the next week.

Basic vanilla cupcakes with buttercream icing.

Molly’s Victory-Garden Chocolate Ice Cream Flowerpot – This is a modification from the version served at the American Girl cafe. I took the idea from the Pioneer Woman Cooks blog, substituting ice cream from chocolate mousse and a real flower instead of artificial. One word of caution – do not place ice cream straight into the clay pot as it is not meant for food service. I found small aluminum muffin tins that fit the pot like a glove. This is a great make ahead part of the tea, and you simply take out the ice cream tins just before serving and place flower in the straw. Let ice cream thaw a bit, otherwise you will have impenetrable ice cream and ground oreo dirt everywhere.
So now you too can throw an American Girl tea party that even the adults will love. Be sure to have a pot of real tea on hand.
Bakers Challenge for January: Tuiles
January 30, 2009

This month’s challenge is brought to us by Karen of Bake My Day and Zorra of 1x umruehren bitte aka Kochtopf. They have chosen Tuiles from The Chocolate Book by Angélique Schmeink and Nougatine and Chocolate Tuiles from Michel Roux. My daughter turned 8 this month, and I decided to make tuiles tiaras, perfect for my little drama queen. I paired it with raspberry sorbet and the crisp cookie was a great hit among the 8 year old set. By far the simplest and most inexpensive Daring Bakers Challenge I’ve participated in, it was was also enjoyed by everyone who tasted it.
Following is a recipe taken from a book called “The Chocolate Book”, written by female Dutch Master chef Angélique Schmeinck.1/2 cup / 2.3 ounces sifted all purpose flour
1 table spoon cocoa powder/or food coloring of choice
Butter/spray to grease baking sheet
Tuiles
Yields: 20 small butterflies/6 large (butterflies are just an example)
Preparation time batter 10 minutes, waiting time 30 minutes, baking time: 5-10 minutes per batch
65 grams / ¼ cup / 2.3 ounces softened butter (not melted but soft)
60 grams / ½ cup / 2.1 ounces sifted confectioner’s sugar
1 sachet vanilla sugar (7 grams or substitute with a dash of vanilla extract)
2 large egg whites (slightly whisked with a fork)
65 grams /
Oven: 180C / 350F
Using a hand whisk or a stand mixer fitted with the paddle (low speed) and cream butter, sugar and vanilla to a paste. Keep stirring while you gradually add the egg whites. Continue to add the flour in small batches and stir to achieve a homogeneous and smooth batter/paste. Be careful to not overmix.

Cover the bowl with plastic wrap and chill in the fridge for at least 30 minutes to firm up. (This batter will keep in the fridge for up to a week, take it out 30 minutes before you plan to use it).
Line a baking sheet with parchment paper or grease with either butter/spray and chill in the fridge for at least 15 minutes. This will help spread the batter more easily if using a stencil/cardboard template such as the butterfly. Press the stencil on the bakingsheet and use an off sided spatula to spread batter. Leave some room in between your shapes. Mix a small part of the batter with the cocoa and a few drops of warm water until evenly colored. Use this colored batter in a paper piping bag and proceed to pipe decorations on the wings and body of the butterfly (or tiara).
 Bake butterflies in a preheated oven (180C/350F) for about 5-10 minutes or until the edges turn golden brown. Immediately release from bakingsheet and proceed to shape/bend the cookies in the desired shape. These cookies have to be shaped when still warm, you might want to bake a small amount at a time or maybe put them in the oven to warm them up again. (Haven’t tried that). Or: place a bakingsheet toward the front of the warm oven, leaving the door half open. The warmth will keep the cookies malleable.
If you don’t want to do stencil shapes, you might want to transfer the batter into a piping bag fitted with a small plain tip. Pipe the desired shapes and bake. Shape immediately after baking using for instance a rolling pin, a broom handle, cups, cones….

The secret to perfect chocolate chip cookies
December 18, 2008

Yesterday on a long drive from Baltimore, I listened to scientist and baker Shirley Corriher explain the chemistry of baking on NRP. Several things she said piqued my interest, but I raised the volume when she explained how chocolate chip cookies sometimes flatten and spread, making that unwanted crepe-like cookie. She said to do two things to keep those cookies thick like one sees in bakeries.
- Use bread or unbleached flour since they have a higher protein content.
- Make the dough and refrigerate overnight to let it hydrate for a longer period. The longer the moisture can combine, the better for more gluten strands and breaking down starches and sugars.
I decided to make a test batch using both techniques (I used unbleached bread flour to hedge my bets). I used the classic Toll House recipe (I usually do) with Ghiardelli semisweet chip and walnuts. The results? Absolutely no spread whatsoever. I’m not sure if it was the bread flour or the refrigeration, but these cookies were the perfect thickness. Try one or both of these easy steps to ensure perfect chocolate chip cookies the next time you bake a batch.

Girl Scout cookies year round
November 19, 2008

Even before my daughter became a Brownie, I would stalk local grocery stores and malls for girls sporting bemedaled green sashes sitting behind a table piled high with those familiar colorful boxes. I loved them all – Shortbread, Thin Mints, Tagalongs and of course, my particular favorite, Samoas (which is also known as Caramel De-lites). Alas, these cookies are only available during late winter and early spring in my area, so by November, my stockpile of frozen cookies has long been depleted.
Samoas consist of a cookie base, caramel, toasted coconut and chocolate stripes on top. I had some extra homemade caramel and decided to make my own stash of Samoas. I bought sugar free shortbread cookies, mainly because I liked the shape and size, not because it was sugar free. The caramel is very sweet, so I thought all the better. You might want to avoid any cookies with a hole since the caramel will drip through, unless you coat the bottom of the cookie in chocolate (like the original).

Samoas
one container round shortbread or butter cookies (or make your own if you feel ambitious)
one recipe of homemade caramel
8 oz. sweetened coconut
8 oz. semisweet chocolate
Set oven on low broil. Toast coconut on a baking sheet on the lowest rack for 3 minutes or so. Mix coconut to toast evenly and broil for 3 minutes more, being careful to not burn.

Cut out 1/2″ tall nickle-size circles of caramel and flatten on top of the cookie. Top with toasted cococut.

Melt chocolate in a metal bowl over a saucepan of simmering water, stirring occassionally until smooth. (or use a super fancy chocolate tempering machine like me). Holding the coconut-topped cookie carefully, drizzle chocolate on top of the coconut. Place cookies on wax or parchment paper to set.

Musical Lemon Bars
June 24, 2008

Hitting a high note: musical themed lemon bars
It seems the sort of function where one is to bring a dish or dessert dots my calender several times a month. Most recently, I was asked to bring from sort of dessert for my daughter’s biannual violin recital. I’ve already done the usual suspects in the past: chocolate chip cookies, cupcakes, brownies, fresh fruit platter, and the like. The forecast was in the 90s that day, so I decided to make lemon bars. They’re refreshing, delicious and most importantly, they don’t melt.
I made a musical note stencil out of card stock and placed it on each cut bar before I dusted with powdered sugar. One can make any sort of stencil according to the occasion, and this sweet and easy touch makes an ordinary lemon bar cookie special. This recipe is perfectly balanced between tartness and sweetness, with just the right amount of lemon juice and sugar. The texture combination of jelly-like lemon custard and crumbly shortbread makes for a very satisfying dessert.
LEMON BARS
Shortbread base
1 1/2 sticks (3/4 cup) unsalted butter
2 C. all-purpose flour
1/2 C. packed light brown sugar
1/2 tsp. salt
Preheat oven to 350°F.
Cut butter into 1/2-inch pieces. In a food processor process all ingredients until mixture begins to form small lumps. Sprinkle mixture into a 13 x 9 x 2-inch baking pan and with a metal spatula press evenly onto bottom. Bake shortbread in middle of oven until golden, about 20 minutes. While shortbread is baking, prepare topping.

Lemon Topping
6 large eggs
2 1/4 C. granulated sugar
1 1/4 C. fresh lemon juice
1/2 C. all-purpose flour
3 tablespoons powdered sugar
In a bowl whisk together eggs and granulated sugar until combined well and stir in lemon juice and flour.

Pour lemon mixture over hot shortbread. Reduce oven temperature to 300°F. and bake confection in middle of oven until set, about 30 minutes. Cool completely in pan and cut into 24 bars. Sift powderred sugar over bars before serving. These will keep in the refrigerator for a couple of days, but tastes best served the day you make it.

Making hours of screechy violin music a distant memory.
Biscotti of my own
April 12, 2008

Traditional biscotti – just add coffee.
My husband comes from a large Italian family for whom bringing a plate of homemade biscotti to any gathering is de rigueur. The first time I brought my version to a family celebration, I received more than a couple incredulous “You made this?” kind of comments. It’s funny how food is so intricately woven into our very identity. Instantly, the Korean girl who married cousin A. was now truly part of the family.
When I was newly married, I asked my mother-in-law for her mother’s biscotti recipe and have tweaked it enough to feel I could claim ownership to it. After years of my husband’s family telling me how different my biscotti (albeit delicious) tasted from any of theirs, my mother-in-law and I actually went over my recipe ingredient by ingredient since my biscotti was heavy, dense and crumbly and hers was lighter, more porous and crispier. We were bemused to discover the two recipes were completely different and she still has no idea whose biscotti recipe she wrote down for me all those years ago.
This is the only dessert recipe I have committed to memory as I have been making it about once a month for the past 5 years or so. I make it for cookie exchanges, for parties, as hostess gifts, for school snack days, and of course, for our family to munch on. My favorite way to eat it is dunking it in my morning cup of coffee. Or, for those who like to mix it up – try it with a glass of red wine. If your only experience with biscotti is Sahara-dry Stella D’Oro cookies, give this recipe a whirl. I think you’ll like it.
One Spicy Mama’s Biscotti
4 large eggs
3/4 C. vegetable oil
1 tsp. vanilla
1/4 tsp. anise (optional)
4 C. flour
3/4 – 1 C. sugar
3 heaping tsp. baking powder
1 tsp. salt
powdered sugar for dusting (optional)
Preheat oven to 375 degrees. Whisk eggs, oil, vanilla and anise in a medium bowl.

Combine dry ingredients (flour, sugar, baking powder and salt) in large bowl.

Add wet ingredients to dry and mix with whisk or rubber spatula until just combined.

Do not overwork. The flour will be aborbed into the dough because of the high oil content.

Divide dough into two. Pat the dough alternately on the sides and on the top the elongate the dough into a long, slightly domed log, 3-4 inches wide. Repeat with other ball of dough.


Bake at 375 degrees for 15 – 17 minutes or until golden. Take out and let cool slightly.
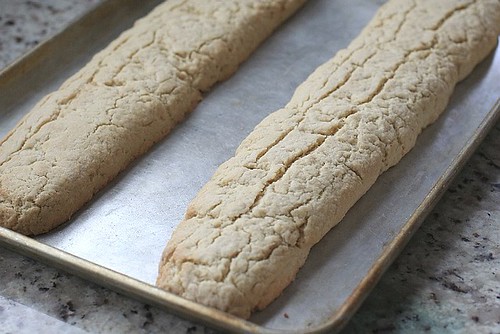
Cut the logs into 3/4 inch wide strips and place on one side.

Place cookie tray on the bottom rack in the oven and broil on high for about 3-5 minutes. WARNING: Do NOT walk away from the kitchen. You WILL burn your biscotti!

Turn the biscotti over on the opposite side and repeat. Let cool completely and dust with powdered sugar if desired.

I have made healthier variations of this recipe using 1 C. whole wheat flour, 3 C. regular flour. That’s a easy way to sneak in more whole grain into your family’s diet. I’ve also tried 1/2 C. Splenda, 1/2 C. sugar combination, but my outraged husband protested so strongly that I never tried it again.
In Praise of Useless Gadgets
March 23, 2008
Most newlywed (or not so newlywed) brides know the mixed blessing of overregistering. Oh – an ice cream maker! The double espresso maker! Pay no mind to the immaterial fact that you like your coffee the color of the sand beaches of a Caribbean island – we need it! So, fast forward to 9 years later. Most of those unused machines still in their original boxes taking up space in your attic, basement (or your parents’ attic or basement) are woefully outdated, out of fashion, and would most likely be passed on your local Freecycle. Or would it?
I recently became the new owner of a previously unused pizzelle maker, handed down from my sister-in-law, who received it her bridal shower … *gasp* off-registry. My son is a pizzelle lover, so this is one gadget I happily made room for. Once you try home-made pizzelle, you will never again buy store-bought ones again. In the one short month we’ve had it, I’ve already made 5 batches to bring to my son’s preschool for his snack day (a huge hit with 4 years olds), to give to as gifts to my husband’s Italian side (met with an approving nod) and of course, to gobble up ourselves.

Pizzelles
3 eggs at room temperature
3/4 C sugar
1/2 C butter (1 stick), melted and cooled
1 tsp. vanilla
1/2 tsp. anise (1/4 or none if you don’t care for anise flavor)
1 3/4 C flour
2 tsp. baking powder
In a large bowl, beat eggs and sugar.

Add the cooled butter, vanilla and anise.

Sift the flour and baking powder together and add to the egg mixture.

The batter will be stiff enough to be dropped by spoon (you will need to use the two spoon method to get it off since it is quite sticky). The batter can be also refrigerated to be used later.


Place a tablespoon of batter slightly above center and close the lid tightly, clamping it shut.

The pizzelles will cook in about 30-40 seconds. Mmmm…. can you smell that?

Cook until golden (slightly brown). If you do not cook it enough, it won’t have that crispiness that makes a pizzelle a pizzelle.

Use a spatula to lift the pizzelle onto a flat plate. I use a marble cheese board since it’s nice and cool and ultra flat. The pizzelles will lift easily and be pliable. You can experiment into forming cones, etc. with a warm pizzelle.

Let the pizzelles cool completely. This may involve swatting little (and big) hands away for a few minutes.

Try your fabulous pizzelles with ice cream. Scrumptious!


my official pizzelle taster

Pizzelles also double as spaceships.


