Girl Scout cookies year round
November 19, 2008

Even before my daughter became a Brownie, I would stalk local grocery stores and malls for girls sporting bemedaled green sashes sitting behind a table piled high with those familiar colorful boxes. I loved them all – Shortbread, Thin Mints, Tagalongs and of course, my particular favorite, Samoas (which is also known as Caramel De-lites). Alas, these cookies are only available during late winter and early spring in my area, so by November, my stockpile of frozen cookies has long been depleted.
Samoas consist of a cookie base, caramel, toasted coconut and chocolate stripes on top. I had some extra homemade caramel and decided to make my own stash of Samoas. I bought sugar free shortbread cookies, mainly because I liked the shape and size, not because it was sugar free. The caramel is very sweet, so I thought all the better. You might want to avoid any cookies with a hole since the caramel will drip through, unless you coat the bottom of the cookie in chocolate (like the original).

Samoas
one container round shortbread or butter cookies (or make your own if you feel ambitious)
one recipe of homemade caramel
8 oz. sweetened coconut
8 oz. semisweet chocolate
Set oven on low broil. Toast coconut on a baking sheet on the lowest rack for 3 minutes or so. Mix coconut to toast evenly and broil for 3 minutes more, being careful to not burn.

Cut out 1/2″ tall nickle-size circles of caramel and flatten on top of the cookie. Top with toasted cococut.

Melt chocolate in a metal bowl over a saucepan of simmering water, stirring occassionally until smooth. (or use a super fancy chocolate tempering machine like me). Holding the coconut-topped cookie carefully, drizzle chocolate on top of the coconut. Place cookies on wax or parchment paper to set.

Victory Brownies
November 9, 2008

The campaign field office has been cleaned out, the lawn signs have been taken down, and I’ve had a few days to reflect on the extraordinary occurrences of the past week. I suppose when you dive head first into a cause that you believe in with your entire being, the effects of its successes are magnified. The surfeit of joy was matched by the exuberant pride I felt in my country, my countrymen and the democratic process. It was truly an honor to participate in Barack Obama’s presidential campaign and those election night memories will stay with me forever.
One thing I was happy to turn the page on was the glut of convience and junk foods that are a hallmark of any campaign, from those ubiquitous boxes of Entenmenn’s doughnuts to the countless hoagies from Wawa. Food was calories in the most basic sense, something to fuel you as you knocked on hundreds of doors. But that part is over for me, thankfully, and I can get back to making food the way I like it.
I decided to make these brownies since I received the recipe on a card at Le Pain Quiotidien in Manhattan, where I lunched with my mother and sister-in-law on Friday. There were only 5 ingredients, all of which I had in my pantry. (One exception – I did not have pastry flour, but it can easily be made with a 1 : 2 ratio of all-purpose flour to cake flour).
These need to baked in cupcake papers since they are extremely crumbly and will fall apart when cut if you try to bake them in a traditional baking dish. They are rich and chocolaty, yet paradoxically light and airy. If you love a heavy dense brownie, you might not like these as much. However, if you simply love chocolate, you should give this recipe a try. It has a wonderful crunchy top and is very moist in the middle. We had this with a tall glass of organic milk (classically delicious), but I think it would be amazing warm with a scoop of vanilla bean ice cream.

Brownies (from Le Pain Quiotidien)
yields 20 brownies
9 oz. bittersweet chocolate (60-64% cacao)
1 C. + 2 Tbs. butter, cut into small pieces
5 eggs, lightly beaten
1 1/3 C. superfine sugar
3 Tbs. pastry flour

Roughly chop the chocolate into pieces. Transfer to a medium bowl and add the butter. Place bowl over a saucepan of simmering water until the two ingredients have melted. Mix well and transfer to a large bowl and set aside.
Preheat the oven to 325º. Sift the sugar and flour together, then stir into the chocolate. Add the eggs and mix well. Cover and let rest at room temperature for 30 minutes. The batter will thicken as it stands.

Line a muffin tin with cupcakes papers. Spoon 1/4 C. of the batter into the paper-lined cups. Bake 30 to 35 minutes. The brownies will still be moist when done. They will puff up and fall slightly as they cool.

August’s Daring Bakers Challenge: Chocolate Éclairs
August 31, 2008

This month’s Daring Bakers Challenge was hosted by MeetaK and Tony and I was excited to discover they had chosen chocolate éclairs. Custards and pastry creams are a weakness of mine, and I still giggle when I recall a Christmas over a decade ago when I attempted a croquembouche as my pièce de résistance. Suffice it to say the tower was more of a molehill and I was still finding sugar filaments days later.
The Challenge required I keep one chocolate element, so I kept the glaze and simply omitted the chocolate from the pastry cream and kept all the other ingredients.
Pierre Hermé’s Chocolate Éclairs
Recipe from Chocolate Desserts by Pierre Hermé
(makes about 15 Éclairs)
• Cream Puff Dough (see below for recipe), fresh and still warm
1) Preheat your oven to 375 degrees F (190 degrees C). Divide the oven into thirds by
positioning the racks in the upper and lower half of the oven. Line two baking sheets with
waxed or parchment paper.
2) Fill a large pastry bag fitted with a 2/3 (2cm) plain tip nozzle with the warm cream puff dough.
Pipe the dough onto the baking sheets in long, 4 to 41/2 inches (about 11 cm) chubby fingers.
Leave about 2 inches (5 cm) space in between each dough strip to allow them room to puff. Score the top lightly with a fork. The dough should give you enough to pipe 15 éclairs.

3) Slide both the baking sheets into the oven and bake for 7 minutes. After the 7 minutes, slip the
handle of a wooden spoon into the door to keep in ajar. When the éclairs have been in the
oven for a total of 12 minutes, rotate the sheets top to bottom and front to back. Continue
baking for a further 8 minutes or until the éclairs are puffed, golden and firm. The total baking
time should be approximately 20 minutes. (I ended up baking the éclairs about 30 minutes and I discovered I should never have opened the oven door).
Notes:
1) The éclairs can be kept in a cool, dry place for several hours before filling.
Assembling the éclairs:
• Chocolate glaze (see below for recipe)
• Chocolate pastry cream (see below for recipe)
1) Slice the éclairs horizontally, using a serrated knife and a gently sawing motion. Set aside the
bottoms and place the tops on a rack over a piece of parchment paper.

2) The glaze should be barely warm to the touch (between 95 – 104 degrees F or 35 – 40
degrees C, as measured on an instant read thermometer). Spread the glaze over the tops of
the éclairs using a metal icing spatula. Allow the tops to set and in the meantime fill the
bottoms with the pastry cream.
3) Pipe or spoon the pastry cream into the bottoms of the éclairs. Make sure you fill the bottoms
with enough cream to mound above the pastry. Place the glazed tops onto the pastry cream
and wriggle gently to settle them.
Notes:
1) If you have chilled your chocolate glaze, reheat by placing it in a bowl over simmering water,
stirring it gently with a wooden spoon. Do not stir too vigorously as you do not want to create
bubbles.
2) The éclairs should be served as soon as they have been filled.
Pierre Hermé’s Cream Puff Dough
Recipe from Chocolate Desserts by Pierre Hermé
(makes 20-24 Éclairs)
• ½ cup (125g) whole milk
• ½ cup (125g) water
• 1 stick (4 ounces; 115g) unsalted butter, cut into 8 pieces
• ¼ teaspoon sugar
• ¼ teaspoon salt
• 1 cup (140g) all-purpose flour
• 5 large eggs, at room temperature
1) In a heavy bottomed medium saucepan, bring the milk, water, butter, sugar and salt to the
boil.
2) Once the mixture is at a rolling boil, add all of the flour at once, reduce the heat to medium
and start to stir the mixture vigorously with a wooden spoon. The dough comes together very
quickly. Do not worry if a slight crust forms at the bottom of the pan, it’s supposed to. You
need to carry on stirring for a further 2-3 minutes to dry the dough. After this time the dough
will be very soft and smooth.
3) Transfer the dough into a bowl of a mixer fitted with the paddle attachment, or using your
handmixer or if you still have the energy, continue by hand. Add the eggs one at a time,
beating after each egg has been added to incorporate it into the dough.
You will notice that after you have added the first egg, the dough will separate, once again do
not worry. As you keep working the dough, it will come back all together again by the time you
have added the third egg. In the end the dough should be thick and shiny and when lifted it
should fall back into the bowl in a ribbon.
4) The dough should be still warm. It is now ready to be used for the éclairs as directed above.

Notes:
1) Once the dough is made you need to shape it immediately.
2) You can pipe the dough and the freeze it. Simply pipe the dough onto parchment-lined baking
sheets and slide the sheets into the freezer. Once the dough is completely frozen, transfer the
piped shapes into freezer bags. They can be kept in the freezer for up to a month.
Chocolate Pastry Cream
Recipe from Chocolate Desserts by PierreHermé
• 2 cups (500g) whole milk
• 4 large egg yolks
• 6 tbsp (75g) sugar
• 3 tablespoons cornstarch, sifted
• 7 oz (200g) bittersweet chocolate, preferably Velrhona Guanaja, melted
• 2½ tbsp (1¼ oz: 40g) unsalted butter, at room temperature
1) In a small saucepan, bring the milk to a boil. In the meantime, combine the yolks, sugar and cornstarch together and whisk in a heavy‐bottomed saucepan.
2) Once the milk has reached a boil, temper the yolks by whisking a couple spoonfuls of the hot milk into the yolk mixture.Continue whisking and slowly pour the rest of the milk into the tempered yolk mixture.
3) Strain the mixture back into the saucepan to remove any egg that may have scrambled. Place the pan over medium heat and whisk vigorously (without stop) until the mixture returns to a boil. Keep whisking vigorously for 1 to 2 more minutes (still over medium heat).Stir in the melted chocolate and then remove the pan from the heat.
4) Scrape the pastry cream into a small bowl and set it in an ice‐water bath to stop the cooking process. Make sure to continue stirring the mixture at this point so that it remains smooth.
5) Once the cream has reached a temperature of 140 F remove from the ice‐water bath and stir in the butter in three or four installments. Return the cream to the ice‐water bath to continue cooling, stirring occasionally, until it has completely cooled. The cream is now ready to use or store in the fridge.

I simply omitted the melted chocolate from the recipe.
Chocolate Glaze
Recipe from Chocolate Desserts by Pierre Hermé
(makes 1 cup or 300g)
• 1/3 cup (80g) heavy cream
• 3½ oz (100g) bittersweet chocolate, finely chopped
• 4 tsp (20 g) unsalted butter, cut into 4 pieces, at room temperature
• 7 tbsp (110 g) Chocolate Sauce (recipe below), warm or at room temperature
1)In a small saucepan, bring the heavy cream to a boil. Remove from the heat and slowly begin to add the chocolate, stirring with a wooden spoon or spatula.
2) Stirring gently, stir in the butter, piece by piece followed by the chocolate sauce.
Notes:
1) If the chocolate glaze is too cool (i.e. not liquid enough) you may heat it briefly
in the microwave or over a double boiler. A double boiler is basically a bowl sitting over (not touching) simmering water.
2) It is best to glaze the eclairs after the glaze is made, but if you are pressed for time, you can make the glaze a couple days ahead of time, store it in the fridge and bring it up to the proper temperature (95 to 104 F) when ready to glaze.
Chocolate Sauce
Recipe from Chocolate Desserts by Pierre Hermé
(makes 1½ cups or 525 g)
• 4½ oz (130 g) bittersweet chocolate, finely chopped
• 1 cup (250 g) water
• ½ cup (125 g) crème fraîche, or heavy cream
• 1/3 cup (70 g) sugar
1) Place all the ingredients into a heavy‐bottomed saucepan and bring to a boil, making sure to stir constantly. Then reduce the heat to low and continue stirring with a wooden spoon until the sauce thickens.
2) It may take 10‐15 minutes for the sauce to thicken, but you will know when it is done when it coats the back of your spoon.

I used melted white chocolate and a toothpick to create the tulip designs. While I had some problems with the éclairs deflating (they simply weren’t cooked enough), I enjoyed this month’s challenge. And my husband’s officemates did too.
You really can’t eat just one: spicy almonds
August 20, 2008

I entertain with some regularity and one constant dish I serve regardless of the type of party is spicy almonds. I usually place dishes of the spicy nuts throughout the house during a party and inevitably, I find the near-empty (or completely empty) dishes at the end along with numerous compliments and requests for the recipe. I made a batch today for my husband who is going on a canoe trip with some buddies. I guess spicy almonds aren’t just for parties anymore.
I use a variation of Martha Stewart’s recipe which calls for blanched almonds. I use dry roasted unsalted almonds since blanched almonds just look so naked. The sugar will caramelizes into little bunches of sugar, which is such a perfect complement to the spicy crushed red hot peppers and cumin.
Spicy Almonds (adapted from Martha Stewart)
1/4 C. peanut oil
4 C. whole dry roasted unsalted almonds
1 C. sugar + 1 Tbs. for sprinkling
3 tsp. kosher salt
3 tsp. ground cumin
2 tsp. red pepper flakes

In a large, heavy-bottomed saute pan, warm the oil over medium-high heat. Add the almonds, and stir with a wooden spoon, coating each thoroughly with oil. Sprinkle with 1 cup sugar, and continue to stir until the almonds become golden brown and the sugar caramelizes, about 4 minutes.

Remove the pan from heat, and pour almonds into a medium mixing bowl. Sprinkle the remaining sugar, salt, cumin, and red pepper flakes over the nuts, and toss well. Pour the spiced nuts out in a single layer on a baking sheet, and separate with a wooden spoon. Allow nuts to cool for about 30 minutes. Spiced nuts can be stored up to two weeks in an airtight container.
International House of Pancakes
June 26, 2008

My personal favorite: Korean mung bean pancakes (bindae duk)
As with many other Korean special occasion foods that are made in large quantities or not at all, mung bean pancakes (bindae duk) are not something one decides to make on a whim. Two ingredients require overnight soaking and the resulting quantities are usually sufficient to feed the entire Duggar brood(although something tells me Korean food isn’t a fav in the Duggar house). For me, however, it is one of those foods evocative of large festive gatherings, the smell delicious foods wafting through the house overheated by cooking and bodies, ending inevitably with the need to unbutton one’s waistband.
One can buy freshly made bindaeduk at Korean mega-marts like Assi and H-Mart, but they never look like this version. Fernbrake, as known as bracken, is relatively expensive and often eschewed for cheaper ingredients like cabbage and carrots. My mother always puts fernbrake (kosari ) in her bindae duk and this recipe is a variation of the kind I grew up with.
In order to make this dish, you need to buy the smallest bags of dried mung beans and fernbrake you can can find at your Korean or Asian grocery store. This recipe calls for 8 C. of soaked mung beans which was an entire bag (sorry, I didn’t note the weight of the bag). One bag of dried bracken makes a shockingly large amount. You can soak the entire bag and use the remaining fernbrake for bibim bap, or just soak what you need.

This bag wasn’t even labeled as “bracken” or “fernbrake.” “Wild Greens” and “Well-being Food” are the only words in English on the package. Gotta love cryptic labeling.

That 100g bag of unpromising dark bracken expands to this soft, uniquely fragrant “meaty” vegetable.
Mung bean pancakes are a great source of protein, gluten-free, and if omitting the pork, can be vegan. The beans give the pancake a heavier texture and you’ll feel full after just a couple (although you will keep eating since they’re so tasty!).
Korean Mung Bean Pancakes (Bindae duk)
Yields 35-40 3-4″ pancakes
8 C. mung beans, soaked overnight with any green casing picked over and discarded
1½ C. hydrated fernbrake, cut 1-2″ long
1 bunch sliced scallions, cut 1-2″ long
1½ C. chopped kimchi
8 oz. thinly sliced pork
3 cloves garlic, minced
¼ C. sesame seed oil
salt and pepper to taste
oil to fry
(you can add up to 4 lightly beaten eggs to this recipe if you wish to make your pancakes less dense.)
Working in batches, liquefy mung beans 2 cups at a time in a blender, adding about 1/4 of water used to soak the beans each batch.

Combine pureed mung bean, fernbrake, scallions, kimchi, pork, garlic, sesame seed oil, salt and pepper in a large bowl.

Heat oil on griddle or large frying pan on medium to medium high. Ladle about 1/4 or 1/3 C. on griddle, making sure not to make the pancakes too thick. I like to keep them between 3 to 4 inches in diameter. Turn over when golden brown (about 4-5 minutes) and add more oil as needed. Serve hot with Korean dipping sauce.

Mung bean pancakes freeze very well, so go ahead and make that large batch. Just defrost and refry when you have a hankering for these delicious pancakes.

I’ve recently become the proud owner of a chocolate tempering machine, along with chocolate molds and other chocolate-making accoutrement, thanks to the chocolate hostess party I threw a couple of months ago.  I had never made chocolates before because it was messy and frankly, candy thermometers frighten me. The chocolate consultant (and my friend) swore to me this machine was going to change my life, and damned if she wasn’t telling the truth. If you call yourself a foodie and you have ever melted chocolate on a double boiler before – you need to get yourself one of these. Just put that untouched bread machine on Craigs List and make room for this. (Psst… while this machine retails for $350+, I paid $99. Yeah, I pimped out my friends, but after biting into perfectly tempered chocolate-covered strawberries, I’d do it again in a New York minute.)
I decided to make fleur de sel caramels, since I keep seeing them everywhere (Trader Joes, gourmet chocolate shops, food blogs). But I wanted to make mine a little different, as everyone cut theirs into little squares and dipped those squares into chocolate. I did have those snazzy new round candy molds … hmm.
Fleur de sel caramels (from Gourmet)
1 C. heavy cream
5 Tbs. unsalted butter, cut into pieces
1 tsp. fleur de sel
1 1/2 C. sugar
1/4 C. light corn syrup
1/4 C. water
Some complained that they couldn’t really taste the salt in this recipe, so I used a heaping teaspoon of the fleur de sel.
Bring cream, butter, and fleur de sel to a boil in a small saucepan, then remove from heat and set aside.
Boil sugar, corn syrup, and water in a 3 to 4 quart heavy saucepan, stirring until sugar is dissolved. Boil, without stirring but gently swirling pan, until mixture is a light golden caramel. This can take about 15 minutes (at least it did for me).
Carefully stir in cream mixture (mixture will bubble up) and simmer, stirring frequently, until caramel registers 248°F on thermometer, 10 to 15 minutes. I cooked it until 246°F since I wanted a soft and oozy caramel. I’ve read reviews of this recipe and some people complain that their caramels were rock hard. I have no idea what made my caramels so soft – maybe it’s because I cooked it at a slower boil?
For those without a candy mold: Line bottom and sides of an 8″ square pan with parchment paper, then lightly oil parchment. Pour the caramel after it reaches 248°F into the baking pan and cool 2 hours. Cut into 1-inch pieces, then wrap each piece in a 4-inch square of wax paper, twisting 2 ends to close.
For those with a candy mold: well before you even start the caramel, temper the chocolate (my machine takes about 28 minutes). Take a paintbrush and “paint” the bottom and sides with the tempered chocolate, coating well. Allow to harden completely.

After caramel reaches 246°F, remove from heat and let cool slightly. Drop caramel with a small spoon into the molds and fill 3/4 full.

Let cool for 10 minutes or so. Top with tempered chocolate, scrape smooth and let set fully. Shake (or slam usually) chocolates out.

After all this work, hubby said they looked like Rolos. Wah.
As you can see, I placed fleur de sel on top of the chocolates, but that was just for the photo (and to eat). The tops of the caramels were the first to be “painted” and are perfectly hard, so I have yet to figure out a way to have the salt stick to the chocolate. The caramel is just the right consistency as evidenced by the oozing from the first photo to the last. And the taste? The rich buttery caramel enrobed in dark chocolate melding with salty sweetness – a perfect combination.

What to do with the leftover caramel and chocolate…
Making store-bought favorites: Pizza
June 6, 2008

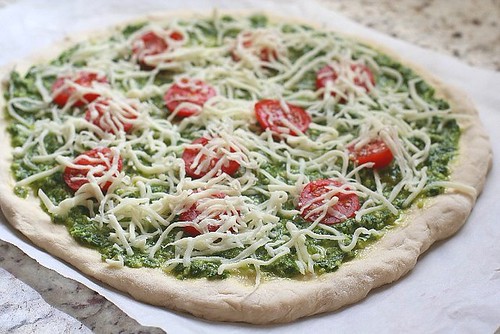
Homemade pizza margherita
 Both my husband and our children are huge fans of Amy’s frozen pesto pizza and we always have a couple in the freezer at any given time. My recent foray into yeast has opened up all sorts of culinary doors to me, and homemade pizza the most recent threshold I’ve finally crossed.
Tonight I decided to make my own version of Amy’s with my own pesto recipe, some cherry tomatoes (I would have used regular tomatoes, but I happen to have three pints of cherry tomatoes in the house), and shredded mozzarella.
Since the recipe makes dough for two pizzas, I also made margherita pizza, using leftover marinara sauce and fresh basil from the garden. I did not stretch out the pizza as thinly as I should have and didn’t have fresh mozzarella. But all in all, it was still a success.
One thing you need to buy if you plan to make your own pizza is a pizza stone (which is also needed if you want to bake bread in the oven). Sorry – there really is no substitute.
Pizza Dough (from Maggie Glezer’s Artisan Baking)
serves 4 (2 medium pizzas)
3 1/3 C. unbleached bread flour
1/4 tsp. instant yeast
2 tsp. salt
1 1/2 C. lukewarm water
Mix flour, yeast and salt together in a large mixing bowl. Add the water and mix until until blended. Cover and let it rest for 10 – 15 minutes to allow yeast to hydrate. Knead dough for 5 – 10 minutes until fairly smooth. Cut into 2 pieces and shape each piece of dough into a tight ball. Place each ball onto a floured tray. Cover with plastic wrap and let dough rise about 5-6 hours.

You might want to spray cooking spray on the underside of the plastic wrap – it will stick!
Place pizza stone in 2nd highest rack and preheat oven to its highest setting (mine is 550° F). Flour the work surface and flatten out your fully risen dough ball with your hand and press into a disk.

Pull out the sides (or you can try to get fancy like the pizzerias and use your raised fist to stretch out the dough).

Place pizza on parchment paper (or pizza peel if you have one). After placing toppings on the dough, slide pizza still on the paper on to the hot stone. Bake for about 6-8 minutes, being careful to not overbake.

I realized afterwards that I forgot the broccoli.

My daughter said it looked perfect – like it came from the grocery store. Awww.

This is a great way to use leftover sauce.

Garnish with fresh basil leaves and drizzle with extra virgin olive oil.
Showers of Happiness
June 2, 2008
I co-hosted a baby shower this past weekend, something I have done quite a few times during the past fifteen years. Whether a bridal or baby shower, christening or any such celebration, the elements of a successful party are always the same. You need:
- lots of delicious food
- attention paid to presentation and decor
- most importantly, people who love and wish the best for the guest of honor
Naturally, the menu is important, and a meager spread is a particular pet peeve of mine. I was raised with the notion that if the table wasn’t groaning under the weight of the food atop it, it wasn’t a good party. One doesn’t have to spend an exorbitant amount of money, but you do have to spend time planning a good menu, having a proper mix of low-cost items, low-effort foods, do-ahead dishes and perhaps one or two show-stoppers.
I am not a cake decorator, and as a result, I’ve always been one to buy cakes for all the showers I’ve been in charge of. I decided to make cupcakes for this shower since I’ve become a bit more emboldened thanks to this blog, and the mother-to-be had wanted cupcakes from Magnolia Bakery for her wedding (alas, it was not to be). I’ve been trying out different chocolate cupcake recipes, and I’ve really like this one I’ve found on Recipezaar. It’s very moist, uses basic ingredients, and doesn’t sink down in the middle as some cupcakes are prone to.

A basic chocolate glaze using melted high quality chocolate and heavy cream tops these delicious cupcakes. I used rolled fondant and a mini onesie cookie cutter from Ebay to decorate these cupcakes with a baby boy theme.
Moist Chocolate Cupcakes
(Yield: original recipe said 24, but I found it only made about 22)
1 1/2 cups flour
1 cup unsweetened cocoa
1 1/4 teaspoons baking soda
1 1/4 teaspoons baking powder
1 teaspoon salt
2 cups sugar
3/4 cup hot water
3/4 cup milk
2 large egg
1/2 cup vegetable oil
1 1/2 teaspoons vanilla extract
Preheat oven to 325° F. Sift the flour, cocoa, baking soda, baking powder and salt into the bowl of a stand mixer fitted with the paddle attachment. Add sugar. Turn the mixer on low and add, in order: water, milk, eggs, oil and vanilla; scrape down the sides of the bowl and beat on medium briefly until smooth.
Scoop the batter into muffin tins lines with paper baking cups; each cup should be about 2/3rds full (maybe even slightly less than 2/3rds). Do not over fill – 3/4ths full is too much! Bake at 325° until a toothpick inserted into the center comes out clean, about 30 minutes.

I also used a basic buttercream and fondant flowers as explained step-by-step in Cake Journal, along with a cupcake tower.

Vases of cut flowers from the garden (peonies, bleeding hearts and roses) add tasteful decorations to any gathering. I try to use in-season fruit as much as possible, and June means strawberries in these parts. Guylian Belgian chocolate and large sweet strawberries: a perfect marriage.
Olive Oil Gelato
May 30, 2008

Homemade olive oil gelato
I’ve reached a bit of a landmark here on my blog – I’ve received my first recipe request. My sister-in-law’s husband is a fan of Mario Batali’s Otto Enoteca Pizzeria on Fifth and 8th St. in Manhattan, and especially of their olive oil gelato.
“You … you can make that?” he queried hopefully.
“Absolutely,” I assured him with the bravado of the very arrogant or the very foolish.
A quick google search later, I discovered that Chef Mario had included the recipe for his famous olive oil gelato in one of his cookbooks. Thank goodness.
Olive Oil Gelato
(adapted from The Babbo Cookbook)
6 egg yolks
1 C. sugar
2/3 C. extra virgin olive oil
3 C. milk
1 C. heavy cream
Combine the egg yolks and sugar in the bowl of an electric mixer. Use the whip attachment to beat them for 5 min on medium speed, or until the mixture is thick and very pale and forms a ribbon when the whip is lifted. Continue beating and drizzle in the olive oil; beat for 2 more minutes.

Warning: this recipe uses raw eggs. Williams-Sonoma has a variation of this recipe with cooked egg; however, it does add a couple of hours to your cooking time since you must wait for the mixture to cool completely.

Add the milk and cream and continue to beat until all ingredients are combined.

Freeze in ice cream maker according to manufacturer’s instructions. This took some planning since I needed to pre-freeze the bowl of the ice cream maker for 8+ hours.
I thought it would taste fruity, but no, it tastes like olive oil. However, olive oil paired with frozen cream is unexpectedly delicious and refreshing. The sweetly salty fluer de sel is the perfect counter to the rich creaminess of the gelato. Molto bene, Mario.

Serve with a drizzle of olive oil and a sprinkling of fluer de sel sea salt.
(Your gelato is in the freezer, Blake.)
Barbecue Part I: spicy Korean pork spare ribs
May 19, 2008

Spicy Korean-style pork spare ribs and cool watermelon salad
My version of spare ribs are spicy and sweet, using Korean red pepper paste (gochu jang). I measured out this recipe for the first time since I’ve always made this to taste, depending on how many ribs I was cooking. This recipe should feed 4 very hungry people (or 6 people who had a snack before dinner).

Gochu jang is available at Korean and Asian grocery stores (and online, apparently).

This red pepper paste is not for the weak-hearted.
Spicy Korean pork spare ribs
1/3 C. Korean red pepper paste (gochu jang)
2-3 cloves of garlic, minced
1/4 C. sugar (or less, depending on how sweet you like it)
3 Tbs. sesame seed oil
1/4 C. water
4-5 scallions cut into 3 inch long pieces
1 medium onion, sliced
2 Tbs. crushed toasted sesame seeds
4-5 lbs. pork spare ribs
toasted sesame seeds for garnish
Combine red pepper paste, garlic, sugar, sesame seed oil and water in a large bowl until smooth and runny.

Add scallions, onions and crushed sesame seeds to mixture. Add spare ribs and coat well.

Refigerate for at least a half hour (I like to put them in for an hour). Heat up grill and cook on medium high, covered for about 6-8 minutes on each side, depending on your grill and the thickness of the ribs. You can cook the onions and scallions on the grill (they will fall through unless you use a grill pan), or discard. Sprinkle cooked ribs with sesame seeds, if desired.

Serve with lots of moist towelettes.
***********************
Something this spicy must be served with something to cool the tongue, and this watermelon salad fits the bill.
Watermelon Salad
3 C. cubed watermelon
1 1/2 C. cherry tomatoes, halved
1/3 C. thinly sliced red onion
1 C. diced seedless cucumber, peeled
3 Tbs. lime juice
2 Tbs. extra virgin olive oil
Kosher salt
fresh ground pepper to taste
Combine watermelon, cherry tomatoes, red onions, cucumber, lime juice and olive oil in a large bowl. Season with salt and pepper and toss lightly. Cover and refrigerate for at least one hour. Serve chilled.


